Preparing For:
OACP Fitness Log
RCMP Standards
Physical Readiness Evaluation for Police (PREP)
Physical Ability Requirement Evaluation (PARE)
There are links at the bottom of this page for workout descriptions, video demonstrations, workout calendars, and workout schedules.
OACP Fitness Log
Below is a link to both the Fitness Log and the OACP Fitness Log Guide for more detailed instructions of the process, including examples of how to fill out each section.
OACP Fitness Guide
OACP Fitness Log
- FIT TO SERVE TRAINING PROMO
- Fit to Serve Online Training provides 12 week online training programs to ensure you exceed fitness testing requirements. As the programming is fully customized, we train for any fitness test. We've helped clients achieve exceptional fitness in the PREP, PIN, PARE, COPAT, A-PREP, FITCO,FORCE, FPAT, CPAT, and more!
- Visit fittoservetraining.com to schedule your free consultation call *Mention PolicePrep and receive 10% off our 12 week customized training program!
RCMP Standards
1) Perform and Record Regular Exercise
You will be provided a fitness log to record your workouts. Even if you do not have the official log, you should be performing and recording your physical activity including the types of exercises, duration and dates.
2) Perform fitness self-assesments periodically
Recruiters will request some basic self-tests to gauge your ability for cadet training. You should perform and record these results every 6 - 12 week or more frequently if you're fitness level is low. The minimum standards below indicate a reasonable chance of meeting the cadet training requirements. Target standards indicate the average fitness level compared to the cadet population across genders. The superior standard identifies the top 10% of cadets. Self tests include:
- 5 kilometre run - Have a 5 km route that is accurate. Avoid using a treadmill for the test. The minimum standard is 30 minutes. Target standards are from 23 minutes 30 seconds to 26 minutes 30 seconds. Superior standards are from 20 minutes 20 seconds to 23 minutes.
- Push-up test - Perform proper push-ups in a row (not from your knees) ensuring that your chin touches the ground at the bottom, your arms are straight at the top and your thighs do not touch the floor. The minimum standard is 10 continuous push-ups. The target standard is 25 - 40 continuous push-ups. Superior standard is 40 - 60 continuous push-ups.
3) Self-declaration of your fitness results
You will be provided a document later in the process where you will attest to your fitness abilities and habits prior to entering the RCMP Training Academy.
4) The Police Fitness Assessment
This is not required during the application process but will be required to pass your cadet training. The police fitness assessment consists of the following activities designed to replicate actual experience you will encounter as a police officer.
- Foot Pursuit - 500 metre run involving directional changes and a 1.4 metre chain link fence to climb.
- Physical Control - Alternately pushing and pulling a sled with 37 kilograms of resistance, laying down and getting back up and pulling down a weighted mannequin that requires 54 kilograms of force.
- Emergency Assistance - Cadets will be required to load 15 objects on the back of a truck bed. There are different shapes of objects weighing 23 kilograms each. Afterward cadets will be required to run 50 metres and carry a weight replicating the weight of lifting a person on a stretcher with another person. The cadet will repeat the task 3 times.
- High Priority Task - Cadets will have additional weight added to them to reflect body armour and carry a 4.5 kilogram weight in their hand. They will sprint 150 metres, climb two flights of stairs and finish with a short sprint. They have 90 seconds to complete the task.
RCMP Police Fitness Assessment Video
PREP Background
- Conducted a comprehensive job analysis to identify policing tasks in which the safety of the police constable, co-workers or the public would be threatened by ineffective performance;
- Compared the job simulation tasks in the PREP with on-the-job policing tasks; and,
- Established standards of acceptability based on the performance times of experienced police officers.
The PARE is a job related physical ability test, which was developed by exercise scientists and is based on extensive research, including a thorough job analysis.
PREP Test Components
There are three separate components to the PREP:
- Pre-exercise Clearance and Informed Consent – a screening component to ensure physical readiness and well-being
- Pursuit/Restraint Circuit – designed to assess physical capability
- Aerobic Shuttle Run – designed to assess physical capability
The PARE has a very similar Pursuit/Restraint Circuit with a few different tasks that have to be performed.
Pre-Exercise Clearance and Informed Consent
The first component of the PREP is subdivided into three separate parts:
- The Physical Activity Readiness Questionnaire (PAR-Q)
- Pre-Exercise Blood Pressure
- Informed Consent
Physical Activity Readiness Questionnaire (PAR-Q)
The PAR-Q is a health inventory designed to identify those adults for whom physical activity might be inappropriate or those who should receive medical advice before beginning an exercise program. It aids in identifying medical conditions that could pose a risk during exercise.
- Has your doctor ever said that you have a heart condition and that you should only do physical activity recommended by a doctor?
- Do you feel pain in your chest when you do physical work?
- In the past month, have you had chest pain when you were not doing any physical activity?
- Do you lose your balance because of dizziness or do you ever lose consciousness?
- Do you have a bone or joint problem that could be made worse by a change in your physical condition?
- Is your doctor currently prescribing drugs (for example, water pills) for a blood pressure or heart condition?
- Do you know of any other reason why you should not do physical activity?
Blood Pressure
Blood pressure is the pressure of the blood flowing through your blood vessels against the vessel walls. It depends on your blood flow (how much blood is pumped by your heart) and the resistance of your blood vessels to blood flow. If the pressure is high, your heart must work much harder to maintain adequate blood flow to your body.
Blood pressure is made up of two numbers and is reported as follows:
| 120 | mmHg | 80 |
The top number refers to your systolic pressure which is the pressure of blood against the artery walls when the heart contracts. The lower number refers to your diastolic pressure, which is the pressure of blood against the artery walls when the heart relaxes between beats.
The ideal blood pressure consists of a systolic pressure of 120 mmHg and a diastolic pressure of 80 mmHg.
Prior to completing the PREP, your pre-exercise blood pressure needs to be measured. If you are 40 years of age or less, answer “no” to all 7 of the PAR-Q questions and have a blood pressure equal to or less than 150/94 mmHg, you can participate in the PREP. Otherwise, a physician must complete the PARmed-X form to give clearance before you can take part in the PREP.
Regardless of your PAR-Q responses, it is suggested that you have a physical examination by a physician before doing the PREP.
Informed Consent
Prior to participation, an informed consent form that contains information about each component of the PREP test and identifies any risks associated with participation must be signed.
Pursuit/Restraint Circuit
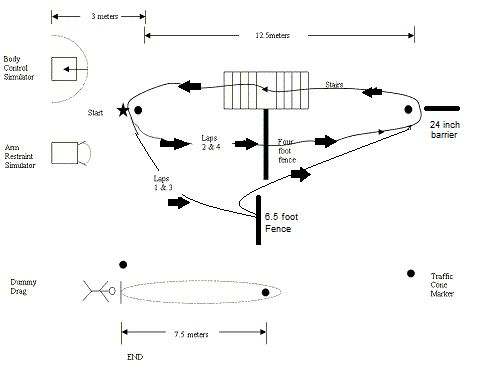
The Pursuit/Restraint Circuit is designed to simulate a police foot chase that includes obstacles, the control of a person who resists arrest and the dragging of an incapacitated person. Performance requires a combination of anaerobic fitness and strength in addition to muscular endurance of the arms, shoulders, back and legs.
| Phase 1 | Pursuit Phase | In the pursuit phase of the test, you run four laps around a 25-metre circuit as quickly as possible for a total distance of 100 metres. You are required to wear a 4 kg soft weight belt around your waist and a 4 kg vest to simulate officer equipment. During the first and third laps you will have to pull yourself up to look over a 1.9 metre fence with a toe-hold, climb up and down a set of stairs, drop to the floor and crawl under a barrier of 61 cm. During the second and fourth laps, you will scale a 1.2 metre fence (no toe-holds), climb up and down a set of stairs and then drop to the floor and crawl under a 61 cm barrier. |
| Phase 2 | Body Control Simulator (After Laps 2 & 4) | After laps 2 and 4 of the circuit, you move to the Body Control Simulator and push / pull a pair of handles as instructed to raise a 70lb weight off the floor. Keeping the weight elevated, you side step through 180 degrees, to the left and right to complete a total of three 180-degree half circles or arcs. |
| Phase 3 | Arm Restraint Simulator (After Laps 2 & 4) | You then move to the Arm Restraint Simulator and depress the handles on the grips of both arms of the simulator. It takes 32lb of force to depress each grip. With the grips constantly depressed, the arms of the equipment are forced together and then returned to their starting position. It takes 37lb of force to retract each arm. |
| Phase 4 | Dummy Drag | Lastly, you gasp a 170lb dummy and drag it a distance of 15 metres. You may grasp the dummy by the wrists or around the chest, under the arms. |
The Pursuit/Restraint Circuit is scored as the total time from the start of the 100-metre circuit to the completion of the victim drag. A time of 157 seconds or less is the minimum requirement for successful completion of the Pursuit/Restraint Circuit. Review the video below for more information.
The Pursuit / Restraint Circuit (PREP)

Aerobic Shuttle Run
The Aerobic Fitness Test requires the completion of the 20-metre Shuttle Run, which is designed to evaluate aerobic fitness and work capability during physically demanding policing tasks as well as everyday policing activities.
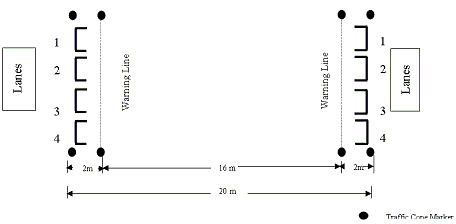
In this test, you run back and forth between two marked lines over a 20-metre course in time with taped audio signals. The time permitted at the beginning of the test to cover the 20-metre distance requires a slow jog. Thereafter, for each 20-metres, the time between audio signals lessens, requiring that you pick up your running pace. The audio signal informs you of the “stage” you are at as the test progresses.
In each leg of the shuttle run, warning lines, placed 2 metres before each of the 20-metre end lines, must be reached before the permitted time elapses and the audio signal sounds. An examiner will caution you if you fail to cross a warning line in time. The test ends when you miss two consecutive warning lines.
To successfully complete the minimum requirement of the aerobic fitness test you must achieve at least Stage 7.0 in the 20-metre Shuttle Run.
An acceptable score on the Aerobic Shuttle Run component requires approximately the same level of fitness as running 2.4 km (1.5 miles) in 11.5 minutes.

Strategy for the Shuttle Run
While performing the shuttle run it is important to pace yourself at the beginning. The early stages of the test can be completed with a quick walk. It is best to pace yourself so that as you reach the opposite side, you can immediately turn around and return the other way. As the pace of the tones increases, increase the pace of your run. This will give your muscles a chance to warm-up.
In order to help you understand the requirements better. We have provided a link on our Public Samples page that will allow you to download a sample of the Beep Test audio file.
Link to Audio Beep Test
It would be a mistake and increase your fatigue, thereby lowering your score if you sprinted in the early stages of the test, and had to wait for the return signal.
Pursuit / Restraint Circuit (PARE - RCMP)
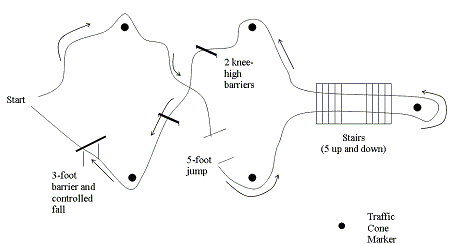
The first two stations have to be completed within four minutes.
In the first station the applicant runs through an obstacle course making a 5 foot jump, climbing up and down 5 stairs, leaping two knee high barriers and climbing a 3 foot barrier followed by a controlled fall.
Station 1 Pursuit/Restraint

Station 2 Restraint
Applicants then have to perform a push a 70-pound weight off the ground and swing the weight in six controlled 180-degree arcs without dropping the weight. After this is accomplished the applicant performs four controlled falls. The applicant then pulls the 70-pound weight off the ground and swings the weight in six more controlled 180-degree arcs without dropping the weight.

Dummy Drag
The final stage is for members to drag an 80-pound torso for a distance of 50 feet.

Video Demonstrations
PREP Videos
PREP Test
PARE Videos
La Cité - RCMP PARE Demonstration
La Cité - RCMP PARE General Information / Training
La Cité - Student Running the PARE
Alberta A-PREP Videos
La Cité - Introduction A-PREP Workshop
La Cité - A-PREP Workshop (2 / 6)
La Cité - A-PREP Workshop (3 / 6)
La Cité - A-PREP Workshop (4 / 6)
La Cité - A-PREP Workshop (5 / 6)
La Cité - A-PREP Workshop (6 / 6)
Preparing for the PREP / PARE / Fitness Assessment
The following information pertains to the different exercises found in the suggested 6-week exercise regime. Since the PREP tests several components of an individual’s physical fitness, the exercise regime contains a variety of different exercises and activities designed to improve aerobic and anaerobic capacity in conjunction with muscular strength, endurance and flexibility of the shoulders, arms, back and legs.
Aerobic Fitness
Aerobic fitness can be defined as the body’s ability to generate energy for working muscles during sustained exercise. This is done through a constant flow of oxygen into your lungs, which can be delivered to your muscles by your heart at a uniform, comfortable rate. In order to improve aerobic fitness, you must consistently challenge your body’s oxygen transport system. In other words, challenging your body’s oxygen transport system teaches your body to utilize oxygen more efficiently. The more efficient your body is at delivering oxygen to your working muscles, the fitter you are.
Improvements in aerobic fitness are gained through exercising at an appropriate frequency, intensity, and duration.
| Frequency | 3-5 times per week |
| Duration |
3 days a week - exercise should last for 50 - 60 minutes 5 days a week - exercise should last for 30 - 40 minutes |
| Intensity | In order to gauge training intensity the best method is to monitor your heart rate. You must learn to efficiently take your pulse or use a heart rate monitor. When taking a pulse, calculate the amount of times your heart beats in a 10-second period. Next, take this number and multiply it by 6. This will indicate your heart rate for a 1-minute interval of time. |
Maximal aerobic gains occur when working at approximately 80% of your maximum heart rate. In order to calculate your target heart rate, or intensity of exercise, use the following formula:
| (220-age) x 0.80 (80%) |
| Example: The target heart rate for a 25-year old individual would be: |
| (220-25) x 0.80 = 156 beats per minute |
This indicates to you that in order to improve aerobic fitness, the individual would have to ensure exercise was occurring at or above a target heart rate of 156 beats per minute for the full duration of the exercise.
Type of Exercise – To improve aerobic fitness, the exercise training must involve large muscle activity such as:
- running
- cycling
- swimming
- cross-country skiing
or active sports such as:
- basketball
- soccer
- squash
- badminton
Since the PREP requires the completion of an aerobic shuttle run, the exercise program provided focuses specifically on running.
Anaerobic Training
As the name implies, anaerobic means “in the absence of oxygen”. Unlike the aerobic system, which requires oxygen to produce and transport energy, the anaerobic system uses the fuel stored in your muscles. Day to day, your body gets its energy from a variety of aerobic and anaerobic sources. The more intense the activity and the more your body’s demand for oxygen exceeds your ability to supply it, the more you work anaerobically. Depending on how fit you are, your anaerobic energy supply will last anywhere from 5 to 60 seconds. This is why anaerobic activities are usually activities that require highly intense, short bursts of energy.
An effective way to train the anaerobic system is through interval training, relatively short bursts of high to very high intensity effort.
- Short duration periods (up to 10 seconds)
- High intensity (80 - 90% of maximum speed)
Followed by:
- Longer periods (up to 30 seconds)
- Low intensity (light jogging)
Approximately 5 - 10 intervals should be completed per workout ensuring that each interval was completed at 80%-90% of maximum speed.
Muscular Strength
Muscles have the ability to produce maximum force at a given point in time, which is called strength. Resistance training, otherwise known as weight training, is useful to develop strength. It focuses on selecting particular exercises, performing specified repetitions for each exercise, and using specific amounts of weight for each lift.
Target Weight to Increase Strength - a weight that you are only capable of lifting 8 - 12 times.
Muscular Endurance
Muscular endurance is referred to as the ability of the muscles to produce force over time while avoiding becoming fatigued. This is what allows a muscle to continuously contract over an extended period of time. Training for muscular endurance usually involves a program implementing high-repetition exercises in the specific muscular system you are training.
Target Weight to Increase Endurance - a weight which you are capable of lifting 15 or more repetitions per set of a given exercise.
Flexibility
Flexibility refers to whether or not you can put your muscles through their full range of motion. Muscles get more powerful only within the range in which they are used.
The Program: Six - Week Training Program
Strength Training Program
The strength training exercises are divided into a two-day cycle. On Day 1 the emphasis will be on the chest, back, biceps and abdominal muscles. On Day 2 the emphasis will be on the legs, shoulders, triceps and abdominal muscles.
The workouts will be completed every two days throughout the duration of the program. This allows the muscle groups 48 hours to recover. This also lends itself well to allowing an aerobic/anaerobic training program to be completed during the off days of the strength-training program.
| Warm Up | Prior to completing the exercises it is important to adequately warm up each of the muscles that will be used throughout the duration of the workout. |
| Week 1 | Spend the first week finding a weight that allows you to fatigue at the maximum number of repetitions required. Make sure to record the weight and completed number of repetitions on the chart provided. |
| Week 2 | If you can complete the required number of repetitions and sets from the previous week, increase the weight by 5%. This will be your new current weight. Try and complete the required number of repetitions and sets at this new weight. Make sure the weight has not been increased unless the required repetitions and sets have been met for the previous week’s weight. |
| Week 3-6 | Continue through each week as indicated in week 2, adding 5% to the previous week’s weight. If the required number of repetitions and sets cannot be achieved for a given weight for 2 consecutive workouts reduce the weight by 3% and continue with the program. |
Note: All exercises are to be done to failure. For this reason, it is important to have a spotter present.
Exercises
Print out a copy of the workout schedule and take it with you to record your weights, repetitions and sets on the chart. Use it as a log.
Also print out a copy of the calendar and post it on your wall. Use it as motivation to complete each day and put a checkmark on each successful day you followed it.
Schedules
Aerobic/Anaerobic Workout
Calendar
Day 1 Schedule (weeks 1-3)
Day 1 Schedule (weeks 4-6)
Day 2 Schedule (weeks 1-3)
Day 2 Schedule (weeks 4-6)
Strength Training
Chest Exercise
Back Exercise
Shoulder Exercise
Bicep Exercise
Tricep Exercise
Leg Exercise
Stomach Exercise
Aerobic/Anaerobic Running Program
The aerobic and anaerobic running components are spread out over three days during each week of the program. During the 6 weeks, training will consist of going for runs, completing a 200 yard shuttle course, completing 50 metre and 25 metre sprints, and completing the 20 metre shuttle run used in the PREP.
It should be noted that the distances covered for each of the runs are targets to try and achieve. You must remember that in order to receive maximal aerobic gains you must work at approximately 80% of your maximal heart rate for the duration of the run. If you are not capable of completing the required distance of each run in the allotted time at least make sure that the intensity of the exercise makes you work in your target heart rate zone for the full duration of the run.
In order to calculate your target heart rate, or intensity of exercise, use the following formula:
| (220-age) x 0.80 (80%) |
| Example: The target heart rate for a 25-year old individual would be: |
| (220-25) x 0.80 = 156 beats per minute |
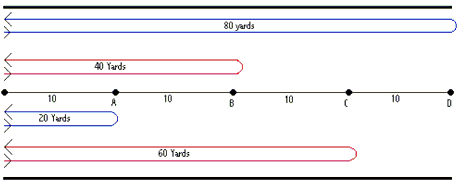
When completing each 200-yard shuttle run try your best to complete each cycle in the allotted amount of time. If you cannot do so, make sure you at least finish each cycle without altering the time allotted for the rest period.
To complete each cycle you must continuously run from the:
- Start to A and back to the Start
- Start to B and back to the Start
- Start to C and back to the Start
- Start to D and back to the Start

When completing the speed sprints you must make sure to cover the full distance (25 metres or 50 metres). Do not slow down before passing the finish line. Also, try to be as consistent as possible in relation to the intensity of each sprint (i.e. 70% maximum effort). Make sure that each sprint is run at a pace as similar as possible to the one before.
Workout ChartPrint out a copy of the work out chart so you can follow it each day of the week. Print out a copy of the calendar (above link) to keep you motivated. Put a check mark beside each day you have completed.

